
Loading...
Loading...
Loading...
Loading...
Loading...
Loading...
Loading...
Loading...
Loading...
Loading...
Loading...
Loading...
Loading...
Loading...
Loading...
Loading...
Loading...
Loading...
Loading...
Loading...
Loading...
Loading...
Loading...
Loading...
Loading...
Loading...
Loading...
Loading...
Loading...
Loading...
Loading...
Loading...
Loading...
There are 3 broad configurations for RelayKeys
Wired Mode. This is where one Bluetooth dongle is in the Sending device
Wireless Mode. This is where a Bluetooth dongle plugged into a power outlet or a battery sits away from the Sending device. This might be useful for devices where you cannot plug anything into the sending device
Wired + Receiving Dongle. A receiving dongle sits in the receiving device. This is useful where "pairing" is unreliable on the recieving device or there is no Bluetooth stack on the receiving computer.
You need to decide what is best for you.
Before you think about using RelayKeys for MindExpress have you tried using MacroSever? Its built into MindExpress. It works well - but does rely on a network/TCP connection to the secondary devices - which also need to run the software.
Plug in your receiving dongle to a device. Your device will see this as a keyboard attached. If you are asked to press some keys for the device to understand it, just close this window for now.
On the sending side, it will pair by default with the receiver. You don't need to do a thing. However, if you have gone and paired with any other devices, you may find this not work. You will need to remove any paired devices and try again.
The easiest way to get up-and-running is with the Windows Installer, which includes the RelayKeys-CLI, and the RelayKeys-Desktop software. Read on to see how to install and setup.
So RelayKeys consists of a hardware solution that talks Bluetooth HID to secondary devices - anything that can pair with bluetooth and understand a keyboard works, and some software on the 'server' device; i.e. the device sending the key/mouse movements. So for our installation we really focus on the 'server' since the recieving device needs no additional hardware or software.
RelayKeys is designed to work on Windows, Linux, and Mac Operating Systems. We have built a Windows installer that makes the process easier on that platform. For Mac & Linux, you will need to build the app from the source.
Windows 7-10
A USB Port
Ability to Install the software as Administrator
and most importantly:
A supported piece of RelayKeys-ready hardware
Right now: this is designed to work with the , or Others will be added to the list as this is developed.
Note: if you wish to use a dongle to receive - instead of relying on a device's internal Bluetooth and pairing etc - you will need a second board.
If you have a pre-prepared Bluetooth stick (for example, from Ace Centre), you don't need to read this section. If you are buying your electronics to use, then read on.
A wide range of Arduino boards supports HID (Human Interface Device). Often these are to emulate simple keypress' but to do more complex things like send one or modifier keys with a key - or to emulate holding a key down for a set period of time is either impossible or difficult to implement. Adafruit has developed the firmware on their Bluefruit nrf* range of boards to emulate HID keyboards well using their AT Commands.
Currently, RelayKeys is designed to work with
Overview of the project and its components
Welcome to the RelayKeys Documentation! This guide will help you swiftly get started, explore advanced features, and understand the concepts that define RelayKeys.
RelayKeys is an open-source software and hardware suite designed to facilitate seamless communication between computers, tablets, and phones via Bluetooth connections. Initially tailored for AAC, its versatile technology extends its utility to a broader range of users who require text input or mouse commands to access Bluetooth-enabled devices.
Although it should work - and we promise you it did work - something has broken functionality working with the LE friend. So we aren't officially supporting this right now
Builds are focused on Windows - but we have started to work on a MacOS build.
For Windows
You need installed and install SimpleSC Plugin: . Then
You will then get a setup.exe
If you wish to create a UF2 file for the firmware we follow (see "Making your own UF2") - making note that we are on M4 based boards.
You can use RelayKeys in a number of different ways depending on your needs
Using our
Using a (that Third-party software such as AAC software can use)
If you are developing the 'server' side of things and want to try out the code you can run this without any hardware by having a null serial terminal. To do this, in a terminal run:
then in another terminal run
NB: Only tested on MacOS but should work on any posix system. For Windows simply give a COM port that doesn't exist.
Adafruit - for being awesome. They have made a super duper board - with love AT Commands
on the Adafruit forums who got this up and running. Awesome.
by Atif Arshad from the Noun Project
Try and go through these steps:
Is your relaykeys stick properly attached? Make sure the blue light is showing. If not you may have a loose connection somewhere.
Is it paired and connected? - you will know this if the blue light is steady (not flashing) on the relaykeys stick
check your COM port. Lastly, it may be that the software cannot find the RelayKeys stick in its list of COM ports. Read this guide to configure and fix your COM port manually.
Check your casing and spacing. If you are using the command line applications, be careful - the application is case-sensitive. It should be type: and not Type: for example
Is it paired and been shown to be connected with the receiving device? If so - and its still not sending text you may need to remove the Bluetooth AceRK device and then pair the AceRK again. To do this open RelayKeys-QT app on the sending device - click on "Add device" and then pair on the receiving device.
Have a look at the keyboard map. You'll need to define/edit a keyboard map for the keyboard you are expecting it to be.
Bluetooth by Adrien Coquet from the Noun Project
Download the installer from here. When downloaded 'Run' the program
Step through the installation procedure. Select 'Normal install' and let the RelayKeys setup software do its thing to install the software in the correct place (By default: C:\Program Files (x86)\Ace Centre\RelayKeys).
If you use 'Portable' or change the location of the software: Make a note of where you have stored the programme, as you will need this when linking it with your software
Update it to 0.8.1. Easiest way to do this is to connect to using the Bluefruit app - it will auto-update it if required.
Plug it in
Set the switch on the device to CMD mode
Open up a serial terminal and connect to the device (See here for exact settings for your Operating System)
Turn on HID Mode. More info here. To be precise - enter this into your serial terminal
(You should see 'OK' after each entry)
Next change the default speed. i.e. enter this in your serial terminal:
Next put the device into DATA mode (slide the switch).
Finally - update the relaykeys.cfg file with
(Or whatever speed you so wish)
pip install -r requirements.txt
pip install -r equirements-build.txt
python build.py python resources/demoSerial.pypython relayekeysd.py --noserial AT+BLEHIDEN=1
ATZ AT+BAUDRATE=115200 baud = 115200
Adafruit Feather nRF52840 Express (Buy in the UK from Pimoroni). Note you can use this or the itsybitsy with a battery and have relaykeys work without connecting it directly to your AAC device.
or with the Adafruit itsybitsy nrf52840
or with lesser support for the The Adafruit - Bluefruit LE Friend - nRF51822 - v3.0 (Buy in the UK from Pimoroni). Although Note: We really aren't supporting the LE Friend much - we do hear it works, but dragons, beware! See below for details on configuring these.
If you are using a receiver dongle - follow the same guidance below but you will also need to copy over the firmware file for the dongle. Same procedure - different file name
Once you have your hardware you need to configure and set them up to work with relaykeys. Read on for how you do this for each device.
You need a piece of hardware - a USB dongle that provides the bluetooth harware to allow your device to be a Bluetooth Keyboard/Mouse. You plug this into your AAC (Host) Windows based device. You can either use a receiving USB dongle on a second device to act as a Bluetooth receiver for devices that don't support bluetooth (and this is pre-paired) or connect directly to Bluetooth enabled devices (Phones, Computers). Once you have the hardware you need to install our software which is designed for Windows.
RelayKeys serves various purposes:
Cost-Effective Solution: For some, it offers a cost-effective alternative or replacement for pricey or obsolete hardware.
Accessibility for Disabilities: Our primary focus is on empowering individuals with disabilities. RelayKeys enables users who rely on dedicated AAC systems, such as Eyegaze, to access other devices essential for work or leisure. Unlike some commercial solutions, RelayKeys functions across devices without needing a shared network. It acts just like a Bluetooth keyboard and mouse, ensuring minimal lag.
Custom Control: Users can utilize RelayKeys to control their tablets or phones, especially beneficial for tasks like music editing or photo manipulation, which typically require full-screen control. Any device responsive to a Bluetooth keyboard or mouse will work, e.g., smart TVs.
Open System: RelayKeys' open architecture ensures longevity and promotes collaboration for system improvements, benefiting both individuals with disabilities and the general population.
While other commercial solutions exist, RelayKeys offers unique advantages:
User-Centric Approach: We urge commercial developers to prioritize user needs and explore open solutions. If our method doesn't resonate with your vision, consider adopting our command set for compatibility and enhancement.
Complementary to Software: RelayKeys has several ways to integrate with your software. We provide examples of its compatibility with AAC Software and a standalone app example written in Python. We also demonstrate how it can be utilized to display text on a separate second screen.
Standardization for Compatibility: An open system ensures compatibility and streamlines development, facilitating developers to craft solutions that resonate with our command structure.
RelayKeys adheres to core principles that underpin its philosophy:
No Client Software/Hardware: Catering to workplace and educational environments, RelayKeys functions without necessitating extra software or hardware on the client device. Provided Bluetooth LE support is available, RelayKeys operates seamlessly.
Device Agnostic: RelayKeys isn't restricted to specific devices or software solutions. Its adaptability allows developers to apply it diversely, promoting innovation.
Open Architecture: RelayKeys is a transparent and open system, standing apart from closed, proprietary counterparts. This transparency fosters collaboration and ensures technology remains relevant despite shifting manufacturer priorities.
The RelayKeys ecosystem includes key components, each fulfilling a particular function:
Our standardized API ensures smooth communication with RelayKeys-compatible hardware devices over serial connections, encompassing USB buses and Bluetooth serial connections. More details are available at this link.
The RK-Service acts as an RPC service, accepting incoming connections and interpreting commands. These commands are converted into AT Commands, mimicking HID keyboard/mouse actions. The AT Commands are subsequently relayed through a serial connection to Bluetooth-integrated secondary devices. A Windows installer facilitates continuous operation.
RK-Desktop is a windowed application tasked with capturing keystrokes and future mouse actions. This data is then relayed to the RelayKeys Service for translation.
The RK-CLI offers a command-line interface for RelayKeys interaction, serving as an adaptable and efficient tool for those familiar with terminal operations.
Harness the full potential of RelayKeys with this documentation. Whether you're an AAC user aspiring for extensive accessibility or a developer pioneering innovative solutions, RelayKeys presents a platform championing accessibility and creativity.
Eyegaze: A technology that tracks where a user is looking on a screen, typically used as an input method for those with limited physical mobility.
Daemon: A background process that runs on a computer system, often providing or facilitating services.
You should see your stick light a solid blue ("Paired") or flashing blue ("Un-paired")
If "Flashing". This means you have yet to pair the RelayKeys device with another computer.
You can do this in three different ways:
Send a command using the "relaykeys-QT.exe" app and press "Add a device" in the toolbar - or -
Run "relaykeys-cli.exe ble_cmd:devadd" - or -
Press the Button on the RelayKeys hardware. It will now flash yellow
Next pair your device with RelayKeys.
So to connect to Another Windows computer, go to Settings, Bluetooth, "Add a device", and connect to "AceRK"
To connect to an iPad/iPhone, go to Settings, Bluetooth and add "Bluefruit52" or "AceRK" or "RelayKeys"
To connect to a mac, Open up "System Preferences", Bluetooth and add "AceRK"
Either use the drag and drop UF2 method or more steps involved - Arduino uploading method. For the UF2 method
Download the UF2 file for the feather nrf52840 express board in the current release__
Double click that reset button. You will then get a USB drive on your computer. Drag and drop the UF2 file to the root of that drive.
It SHOULD disconnect from your Computer if successful and the light should change colour to Green
More details see the steps
Or the Arduino uploading method.
Check the setup of your (remember we're using the nRF52840 board!)
Upload the to your feather.
Run the server side code
Before you look at using RelayKeys with Snap have you considered AccessIT 3? Its available for TD software and is good! There are some snags - its not multi device compatible and does require the dongle being plugged in.
You need to edit your snap pageset - and create a "General" button - then you can add an action to a button. The action
The server (RPC server or daemon as we sometimes refer to it) is the component that opens up a connection to the COM port and sends the correct AT command to the board. You can control it with some arguments
When you use our installer it installs this as a service. If you run the code without installing (or you turn the service off for some reason) you can run it as relaykeysd.py or relaykeysd.exe
Run the daemon and dont try and connect to hardware. If you are on linux/MacOS you can fake a serial port . If you are on Windows just fix a COM port in the config file or use the --dev option - just choose a non-existent COM port
Force the daemon to use a COM port rather than auto detecting one.
e.g.
python relaykeysd.py --noserial --dev=COM7
For more info see
Sets a more verbose debugging output on the console.
Give a pidfile for the daemon to crate - or link to one.
Default: pidfile
File to use as a log file for the debugging messages.
Default: logfile
File to use as a config file. For more info see
Default: relaykeys.cfg
Use the daemon in wireless (ble_mode) or wired mode.
Default: false
Either use the drag and drop UF2 method or more steps involved - Arduino uploading method. For the UF2 method
Download the UF2 file for the raytac dongle in the_ current release__
Press and hold thr reset button as you plug it into the computer. You will then get a USB drive on your computer. Drag and drop the UF2 file to the root of that drive.
Or the Arduino uploading method.
Check the setup of your (remember we're using the nRF52840 board!)
Upload the to your feather.
Run the server side code
If you don't want to use any specific AAC software, you can get going with our demonstration software "RelayKeys-QT" (aka RelayKeys or RelayKeys Desktop). You will find this on your desktop as well as your start programmes if you have installed our software. It has 4 main buttons on the left:
This screen enables you to capture the keystrokes and mouse movements and any captured input gets sent directly to the currently connected device. To connect a device - see "Devices" screen.
is a AAC software for Tobii Dynavox communication aids . Follow the steps below to add commands to your pageset
Pageset quick start. Want a headstart? Download the Pageset . It has all the commands you should need. Just import, add the pageset to your Home Page and adapt
Open up something on the second computer that you can enter text into. E.g. Notes on the iPad, Notepad on Windows or Notes on a mac
On your server computer (the one with RelayKeys attached) run "RelayKeys" (search for it in your Windows search bar). Alternatively find it in C:\Program Files(x86)\Ace Centre\RelayKeys\relaykeys-qt.exe
Done!


Done!


This screen enables you to create a macro file. This records your mouse or keystrokes and enables you to play it back. This is useful for creating long sequences of commands or say for writing a common piece of text such as a signature. You can play it back in this software or use the macro with the CLI tool.
This screen enables you to switch between paired devices and change the current mode. This means the RelayKeys hardware can run either as a wired dongle or a wireless device. Use the switch mode to change these modes.
This screen enables you to add and remove paired devices - as well as removing all devices from the relaykeys hardware.

This is the best way to enter longer texts and allows you to use the communication aid's prediction and phrase banks etc. Use the "Copy" command followed the Run Program command to run relaykeys-cli-win.exe with the paste argument
This is useful for making a keyboard-like page with individual letters and other keys that send one keystroke at a time. Use the Run Program command to run relaykeys-cli-win.exe with the keypress:LETTER argument (where letter is the key you want to send)
For special commands and shortcuts such as control-C, alt-F4 etc use the Run Program command to run relaykeys-cli-win.exe with the keypress:KEYNAME,MODIFIER argument (where keyname is the key you want to send)
Use the Run Program command to run relaykeys-cli-win.exe with the mousemove:X,Y argument (where X,Y is the distance you want to move the mouse), or the mousebutton:BUTTON,ACTION argument (where BUTTON is the button to use, and ACTION is click or doubleclick etc.)
Use the Run Program command to run relaykeys-cli-win.exe with the ble-cmd:reconnect, ble-cmd:switch, or ble-cmd:devname --notify commands

You can get going by using one of these example files that work with your AAC Software:
When you are ready, have a read of how to integrate the features you need.
👍 You've successfully installed and setup RelayKeys! Now you may want to use the CLI or QT program. Read on to find out how these work.
😞 Got a problem? Dang! See our troubleshooting guide.
bbx10 on the adafruit forums. bbx10 developed the Ascii to HID translation function. A massive thanks - the code is currently mostly his. He also worked out some of the early problems on speed issues we were having. You can read the full thread .
from . Not really spent much time looking at this - but looks neat. Converts hardware keyboards to Bluetooth.
- Converts Serial devices to Keyboard. Kind of the other way round to what we want.
. Turns a Pi into keyboard emulator
. Uses a ESP32 as a mouse/keyboard over serial. Very similar idea. (See for details about this in relation to using VNC (TY )
was an attempt to create a Mac Port of "MacroServer" developed by for MindExpress . This is a protocol for communication over a TCP/IP stack. Its pretty nice - but if you are in a school or business allowing others machines to access the network in this way is often restricted. It can also be pretty flaky
/ - have the neatest commercial solution out there for AAC. You can either plug in a USB cable - or use a bluetooth dongle to connect with another computer. Its awesome - but sadly only available to you if use one of their devices.
the was pretty neat. You can still get this in Japan and does a very similar job
The (now discontinued) looked like exactly the same dongle - but with different software.
Both of these products though failed to respond to software (on-screen) keyboards reliably.
Right now we are focused on Windows AAC Software. For iOS or Android, a developer needs to support relaykeys for it to work.
Most AAC software has a way of connecting to an external application. Some call this "Run Programme or something similar. As long as RelayKeys is installed and the correct hardware is connected you can then call the installed command line application - with .
Take a look at the guides for your software.
The key application you want to access is the relaykeys-cli-win.exe found in C:\Program Files (x86)\Ace Centre\RelayKeys
\ For a full list of commands you can send see .
If you pass the --notify flag to the cli application you will get notifications about the devices you are connected to and the status of the device. See for more information
There is no documented way for third parties integrating their software into commercial AAC software for example integrated notifications. So we have to make use of the operating system notification system. The difficulty on Windows is that by default full screen apps do not see notifications. So to make this work we recommend three alterations to your notifications.
Turn Focus Assist off.
Turn off the setting "When I'm using an app in full screen mode"
And next - because AAC users wont typically be able to dismiss notifications change the time that they appear for. To do this follow the steps .
Warning: This mode definitley is slightly more laggy and can be fiddly to setup.
Note that this mode is useful on devices where you can't plug anything into your device. The setup can feel strange - what we need to do is tell your relaykeys hardware the device to connect to.
Plug in device and follow instructions
Pair the main AAC/Host device with it. So pair the computer you have attached it to with RelayKeys hardware. This can feel a bit strange - you are connecting the hardware to the same machine you are on. See for how to put it into pairing mode.
Disconnect the relaykeys hardware. In your bluetooth settings you actually need to click on the item and "Remove" device. (NB: If you cant do this it might be because you need to be an admin. The trick is open the Control Panel -> Devices & Printers -> Relaykeys -> Right click, Remove and you will be asked for an Admin password)
Plug relaykeys into a power source - away from the computer. Your RelayKeys may have a battery or you might need to plug into a wall USB power source.
Double press the User switch It should now shine a nice blue colour!
Run RelayKeysd with --ble_mode See for more details
RelayKeys is a mixture of a Open Hardware board that communicates in Bluetooth LE and acts as a BLE HID device (i.e. a keyboard/mouse) which can emulate all keyboard keys and their modifiers as well as mouse movements. (4). This is controlled by a serial connection from a device - either wired (i.e. as a USB dongle) or wireless (i.e. as a BLE Serial device). We have developed RPC server (2) for a desktop computer which simplifies software connecting to the serial bus and allows us to create a simpler way of sending commands to the device than AT commands. This is done either directly via the RPC Server (Daemon) or via a Command Line Interface (CLI). **** As a demonstration we also have a small graphical interface application (RK-Desktop also referred to as the Relaykeys-QT application) (1).
If you make software and want to benefit from the features of RelayKeys you can either write commands to the RPC server (2), or via our CLI (1) or if you wish direct to the serial interface (6). This can be wired serial or wireless if you put the device into wireless mode (5). Even if you wish to ignore our hardware we do ask Assistive Technology developers to consider copying the command structure at either one of these levels to allow for open development.
Either use the drag and drop UF2 method or more steps involved - Arduino uploading method. For the UF2 method
Download the UF2 file for the itsybitsy board in the current release
Double click that reset button. You will then get a USB drive on your computer. Drag and drop the UF2 file to the root of that drive.
The AAC world has been trying to create standards for this for years.. and some have succeeded. Check out AACKeys and the "GIDEI" protocol - which now feels a little outdated but a great attempt at standardising communication between AAC devices and other systems over serial.

arduino/ - firmware for the arduino board
docs/ - VuePress docs for http://acecentre.github.io/relayKeys/. Build Script is docs-deploy.sh
resources/ - Helper files for development (e.g. demoSerial.py which pretends to be an arduino board connected, viewComPorts which outputs the connected com ports), AAC software pagesets and all-keys.txt which is a output of all the keys supported by RelayKeys. Also note the development files - relaykeys-pygame and relaykeys.py - which are stripped down versions of the whole project. Useful for debugging and testing things without the daemon server. Just move relaykeys.py into the root directory to get it to work.
blehid.py - Library/Import file used by relaykeysd. Includes the function that writes the AT command to the serial port, init the serial port, and sends keyboard/mouse codes.
build.py, buildinstaller.nsi - Build files to turn this project into a installer. Run python build.py to trigger the build.
docs-deploy.sh - deploys the documentation to the github pages site.
relaykeys-cli.py - This is the command line interface version of relaykeys. Conencts to the daemon server.
relaykeys-example.cfg - The default config file. Note this gets copied on install to the right location and is used as the standard config. Note commented out baud and dev lines. Dev fixes the COM port if the com port finding code doesn't work
relaykeys-qt.py - The GUI version of our relakeys testing app.
relaykeys.spec.ini - Used for the NSIS build (i.e. buildinstaller.nsi)
relaykeysclient.py - The main library file used by -cli and -qt versions. Connects to the server.
relaykeysd-service-restart.bat, relaykeysd-service.py - The Windows service applcation
relaykeysd.py - The daemon. This is what is run in the background - and controlled by the service. If you want to test RelayKeys - run this file first - and leave it running. e.g. python relakyeysd.py &&. Note the command line flags in the header.
Prerequisites
Have access to a nrf52840 arduino board. e.g. the Adafruit nrf52840 express
Grab a nrf52840 board and load the arduino code onto it. Plug it in a usb slot on your computer
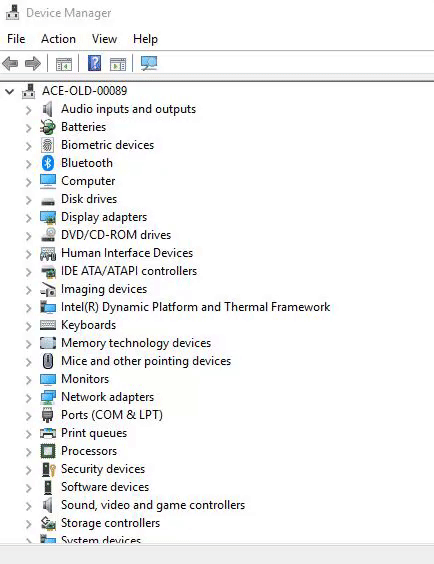
Check your arduino is working as expected. Find and make a note of the COM port it is (found in the device manager)
Download the code to a sensible location - e.g. git clone https://github.com/AceCentre/RelayKeys.git
Copy the relaykeys-example.cfg file e.g. copy relaykeys-example.cfg relaykeys.cfg
Install requirements e.g. pip install -r requirements.txt
Run the Daemon code. python relaykeysd.py
Pair your relaykeys arduino with a PC/Mac/iOS/Android device and open a text file
Test it out with the cli file e.g. python relaykeys-cli.py type:Hello
You should, if everything is working as expected, see it type on the second device. If not have a look at the log files.
One problem may be that the daemon cant find the COM port. You can fix this by fixing the com port you found in step 2 and putting it in the config file. e.g. add dev=COM6 if the com port is 6. More information can be found here

It SHOULD disconnect from your pC if successful – but as I say the loghts should change colour to Green
More details see the steps here
Or the Arduino uploading method.
Check the setup of your Arduino IDE (remember we're using the nRF52840 board!)
Upload the sketch to your feather.
Run the server side code
Done!


Baud rate should be 115200
Hardware flow control CTS/RTS on
nrfVID = '239A'
nrfPID = '8029'
Then you send and receive commands over Serial. The following is a list of the commands and what you should expect to receive back
The good thing about RelayKeys is that we dont try and send actual characters - we send actual keys. This is good - as it means we dont deal with the multilingual problems and different keyboard maps. However - it does mean the the command to send and press a keyboard key can look a little daunting. Here is what it looks like.
AT+BLEKEYBOARDCODE=02-00-00-00-00-00-00-00
This is pretty standard stuff when it comes to a keyboard HID code. E.g. look at this to see what its all about. In short though:
The letter "a" is usage code 0x04 for example. If you want an uppercase "A", then you would also need to set the Byte 0 modifier bits to select "Left Shift" (or "Right Shift").
AT+BLEHIDMOUSEMOVE=X,Y,WY,WX
X = Right Pixels
Y = Down pixels
WY = Scroll Down
WX = Scroll Right
MouseMoveX = Pixels RIGHT and MouseMoveY = Pixels DOWN. So to go RIGHT/UP = use negative numbers.
e.g. This moves it Right by 10 and Down by 10
AT+BLEHIDMOUSEMOVE=10,10,0,0
AT+BLEHIDMOUSEBUTTON=Button[,Action]
Button is one of
l = Left
r= Right
m=Middle
b=Mouse backward
f=Mouse forward
NB: Mouse backward and forward are not available functions on all Operating Systems
Action is
Click
Doubleclick
O (which acts as press/release toggle)
e.g.
Single click:
Double click:
Adds a new device to the cached list of devices. After giving this AT command the user should connect with the board via BLE. If connection is successful then the device's name will be added into the list and the board will connect with the device.
Note: A user can only add a new device if the cached list is not full. If the list is full then the board will return with an Error. If no new device connects with the board till the timeout (set to 30 seconds), a Timeout Error will be returned.
This AT command will remove said device's name from the cached list. Device's name should be written between double quotes. You have to be exact with this! If device_name is not found in the list, then the board will return with an Error.
If device_name is currently connected to a BLE device, then the board will disconnect from this device and then remove device's name from the list.
This AT command will return the currently connected BLE device's name. If the board is not connected with any BLE device then it will return NONE.
This AT command will switch the BLE connection to the next device in the cached list. The board will try to connect with the next listed device till the timeout, then Timeout Error will be returned and the board will try to connect with the next device listed in the cache.. and so on..
This AT command will return a list of device names.
This AT command will change the maximum number of BLE devices possible in the cached list. The number should be greater than 0 and less then 15
Gets the current mode - either wired or wireless.
Switches the current mode from wired to wireless. Or Wireless to wired.
Note if the device IS NOT connected to RelayKeys wirelessly then it will stop responding. You will have to switch connection a different technique. See here for more details
    Byte 0: Keyboard modifier bits (SHIFT, ALT, CTRL etc)
    Byte 1: reserved
    Byte 2-7: Up to six keyboard usage indexes representing the keys that are
              currently "pressed".
              Order is not important, a key is either pressed (present in the
buffer) or not pressed.AT+BLEHIDMOUSEBUTTON=l,clickAT+BLEHIDMOUSEBUTTON=l,doubleclickUse the relaykeys-cli-win.exe with the keypress:LETTER argument (where letter is the key you want to send)
Use the "Copy" command followed by the relaykeys-cli-win.exe paste argument
It takes significant resources to maintain and advance RelayKeys. If you'd like to help keep RelayKeys active and open-source please consider supporting it through one of the methods below.
Our development and research all cost money. If you can spare the cash, we have a few ways to help us keep the lights on.
We accept memberships through our Patreon account. These monthly donations are the ideal financial contribution since they're a bit more dependable and we can roughly predict the monthly amount. (not yet released)
Please donate to us via . Small or large donations welcome!
Whether squashing , the codebase, increasing test coverage, or adding , submitting pull-requests through GitHub is extremely valuable.
No technical skills? Not enough time for a pull-request? No problem! We have plenty of that could use some extra attention. Fix spelling, add code examples, help organize, write new articles, or just check for ... it all helps.
RelayKeys is a worldwide project. Our team and users are spread out across the globe and often speak different languages. If you do too, we'd love to get RelayKeys . It's easy, and each new translation opens the door to a huge number of new users.
This one is surprisingly underutilized. If you encounter a bug within RelayKeys, no matter how small, we would love to hear about it. With such a small team, it's difficult for us to test every commit. Sometimes after we update a small snippet of code, a totally different piece of code breaks elsewhere. More people using and testing the software is always good, but if no one reports the issues they come across then it may not get fixed!
Have a few followers on Twitter? A quick post mentioning our account goes a long way. We've even been known to re-tweet some of our favorite shout-outs. And be sure to follow us to get the most up-to-date info on new features, releases, and sneak-peeks.
One sentence. Even that was a sentence and it was only two words! If you're a fan of RelayKeys, we'd love to hear why with a short endorsement. Shoot us an email, Tweet, or message. And if you'd like to have your testimonial be sure to include your name, title, company, and picture.


RelayKeys now supports multiple keyboard layouts for different languages and regions:
us_keymap.json - US English QWERTY layout
uk_keymap.json - UK English QWERTY layout
de_keymap.json - German QWERTZ layout
fr_azerty_keymap.json - French AZERTY layout (NEW!)
es_qwerty_keymap.json - Spanish QWERTY layout (NEW!)
it_qwerty_keymap.json - Italian QWERTY layout (NEW!)
To use a different layout, simply change the keymap_file setting:
French AZERTY:
Accented characters: é, è, à, ç, ù
Special symbols: €, £, ², ³, °
Proper AZERTY key positioning
Spanish QWERTY:
Special characters: ñ, Ñ
Inverted punctuation: ¿, ¡
Accented vowels: á, é, í, ó, ú
Euro symbol: €
Italian QWERTY:
Accented vowels: à, è, ì, ò, ù
Special symbols: €, £, °, §
Each file is a json file (tip - using jsonlint to check its formatted ok) looks something like the below where the string is sent dependent on the characters sent. eg. on a UK keyboard ! is sent by presing shift and 1.
RelayKeys software tries to find the RelayKeys board automagically. If you have a device with a number of COM ports attached - or ones that have similar functionality you may have some difficulties. If so try fixing the COM port.
Access Device Manager. Search for "Device Manager" in Windows.
Click on Ports. If you only have RelayKeys connected you should see one device. If you see many - try unplugging it and replugging it in to find which COM port it is.
Note the number and edit your RelayKeys cfg file. Search for "RelayKeys config" in Windows - and open with Notepad.
Type dev = COM3 where COM3 is your port number you found in step 2-3.
[server]
host = 127.0.0.1
port = 5383
username = relaykeys
password = QTSEOvmXInmmp1XHVi5Dk9Mj
logfile = logfile.txt

[client]
host = 127.0.0.1
port = 5383
username = relaykeys
password = QTSEOvmXInmmp1XHVi5Dk9Mj
toggle = 1
togglekey = A
togglemods = RALT

[cli]
keymap_file = us_keymap.json[cli]
keymap_file = fr_azerty_keymap.json{
"\r": [null, null],
"\t": ["TAB", []],
" ": ["SPACE", []],
"`": ["BACKQUOTE", []],
"~": ["BACKQUOTE", ["LSHIFT"]],
"!": ["1", ["LSHIFT"]]
}Our small team truly appreciates every contribution made by our community: user stories, feature requests, bug reports, and especially pull requests!. If you have any questions please reach out to our Core team at AceCentre.
So you use RelayKeys? Like what we are doing? Got a real problem that needs fixing but don't understand all this code stuff? Please get in touch. We will try and help - but please note; this is very much a open source, and fundraised project. If you can please consider donating the project
This is the home to the project. Please fork and make changes on this project going forward. A quick overview of the contents:
arduino/ contains sketches to make the board work. A massive thanks to Adafruit as the nrf52840 is their board with their firmware and this code is largley their example code. We have added mouse functionality
docs/ The folder containing the docs (these docs that you are reading!). Its all made with gitbook
resources/
Before we get into the full-blown "proper" way to do a pull request, let's quickly cover an easier method you can use for small fixes. This way is especailly useful for fixing quick typos in the docs, but is not as safe for code changes since it bypasses validation and linting.
Sign in to GitHub
Go to the file you want to edit (eg: )
Click the pencil icon to "Edit this file"
That's it! GitHub will create a fork of the project for you and submit the change to a new branch in that fork. Just remember to submit separate pull requests when solving different problems.
Loosely based on by
We like to keep a tight flow when working with GitHub to make sure we have a clear history and accountability of what changes were made and when. Working with Git, and especially the GitHub specific features like forking and creating pull requests, can be quite daunting for new users.
To help you out in your Git(Hub) adventures, we've put together the (fairly standard) flow of contributing to an open source repo.
Whether you're working on the API or the App, you will need to have your own copy of the codebase to work on. Head to the repo of the project you want to help out with and hit the Fork button. This will create a full copy of the whole project for you on your own account.
To work on this copy, you can install the project locally according to the normal installation instructions, substituting the name acecentre with the name of your github account.
If you're doing more work than just a tiny fix, it's a good idea to keep your fork up to date with the "live" or upstream repo. This is the main acecentre repo that contains the latest code. If you don't keep your fork up to date with the upstream one, you'll run into conflicts pretty fast. These conflicts will arise when you made a change in a file that changed in the upstream repo in the meantime.
When using git on the command line, you often pull and push to origin. You might have seen this term in certain commands, like
or
In this case, the word origin is refered to as a remote. It's basically nothing more than a name for the full git url you cloned the project from:
is equal to
A local git repo can have multiple remotes. While it's not very common to push your code to multiple repo's, it's very useful when working on open source projects. It allows you to add the upstream repo as another remote, making it possible to fetch the latest changes straight into your local project.
When you want to update your fork with the latest changes from the upstream project, you first have to fetch all the (new) branches and commits by running
When all the changes are fetched, you can checkout the branch you want to update and merge in the changes.
If you haven't made any commits on the branch you're updating, git will update your branch without complaints. If you have created commits in the meantime, git will step by step apply all the commits from upstream and try to add in the commit you made in the meantime. It is very plausible that conflicts arise at this stage. When you've changed something that also changed on the upstream, git requires you to resolve the conflict yourself before being able to move on.
::: danger Conflicts You should always favor changes on upstream over your local ones. :::
Whenever you begin working on a bugfix or new feature, make sure to create a new branch. This makes sure that your changes are organized and separated from the master branch, so you can submit and manage your pull requests for separate fixes/features more easily.
::: warning Up-to-date Make sure to update your master branch with the one from upstream, so you're certain you start with the latest version of the project! :::
Prior to opening your pull request, you might want to update your branch a final time, so it can immediately be merged into the master branch of upstream.
::: warning Make sure to check if your branch is up to date with the master branch of upstream. An outdated branch makes it near impossible for the maintainers of acecentre to check and review the pull request and will most likely result in a delayed merge. :::
Once you've commited and pushed all the changes on your branch to your fork on GitHub, head over to GitHub, select your branch and hit the pull request button.
You can still push new commits to a pull request that already has been opened. This way, you can fix certain comments reviewers might have left.
::: tip Please allow the maintainers of upstream to push commits to your fork by leaving the "Allow edits from maintainers" option turned on. This allows our Core Team to help out in your PR! :::
The main thing to be aware of when submitting a new acecentre feature request, is our rule on edge-cases. To keep the acecentre core codebase as clean and simple as possible we will only consider adding features that at least 80% of our user-base will use. If we feel that less than 80% of our users will find the feature valuable then we will not implement it. Instead, those edge-case features should be added as Extensions.
Before adding a new request, you should also first to see if it has already been submitted. All feature requests should include the enhancement label, so you can filter by that. And remember to also check closed issues since your feature might have already been submitted in the past and either or already implemented.
Also, if you want to see the most highly requested features you can sort by :+1: (the thumbs-up emoji).
If your idea passes the 80/20 test and has not already been submitted, then we'd love to hear it! Submit a new issue using the Feature Request template and be sure to include the enhancement label. It's important to completely fill our the template with as much useful information as possible so that we can properly review your request. If you have screenshots, designs, code samples, or any other helpful assets be sure to include those too!
You can also vote on existing feature requests. As mentioned above, the :+1: and :-1: are used for sorting, so adding one of these reactions to the GitHub issue will cast a vote that helps us better identify the most desired (or undesired) features. And remember to add a comment if you have additional thoughts to help clarify or improve the request.
Our core team is always working hard to implement the most highly-requested community features, but we're a small team. If you need the feature faster than we can provide it, or simply want to help improve the acecentre platform, we'd love to receive a pull-request from you!
blehid.py - this is the module used in relaykeysclient and relaykeysd. If you want to view things like keycode conversion and the like - see here.
buildinstaller.py - this is a script that "builds" the pyinstaller binaries - and the NSIS setup.exe.
relaykeys-cli.py - the CLI programme
relaykeys.py - the original code we used to test this. Redundant largely now - but if you want to get your head around how all this works look here first
Describe and submit your changes within "Propose file change"
git push origin mastergit pull origin new-featuregit push origin mastergit push [email protected]:username/repo.git master# Add 'upstream' to remotes
git remote add upstream [email protected]:acecentre/relaykeys.gitgit fetch upstreamgit checkout master
git rebase upstream/master# Checkout the master branch - you want your new branch to come from master
git checkout master
# Create a new branch named newfeature (give your branch its own simple informative name)
git branch newfeature
# Switch to your new branch
git checkout newfeature# Fetch upstream master and merge with your repo's master branch
git fetch upstream
git checkout master
git merge upstream/master
# If there were any new commits, rebase your master branch
git checkout newfeature
git rebase master
We have created a command line interface which allows you to send mouse and keyboard commands to your RelayKeys hardware.
To run it access
relaykeys-cli.exe command:data
or if running it in pure python
python relaykeys-cli.py command:data
and the non-verbose, non-windowed version
python relaykeys-cli-win.py command:data
Where 'command' and 'data' are provided below.
Remember to change your application accordingly We regularly use the term for command line application 'relaykeys-cli' in this documentation. Often though you will want to use the 'relaykeys-cli-win.exe' application that will run a little quicker and has no printed output. Use this for your default call to relaykeys from other applications. If you want to see any errors use 'relaykeys-cli.exe'
If you are developing with the code You must make sure the server is running when you call the cli files. The is the code that turns these commands into the correct AT syntax and access the com port
Keymap files are located in folder. You can choose which keymap file the CLI is going to use in the cfg by assigning file name to keymap_file variable (see )
By default the us_keymap.json is loaded. To run relaykeys-cli with other keymap either change the cfg setting on the cli application. E.g.
relaykeys-cli.exe -c .\relaykeys-example.cfg type:@
See more info on the format
This takes the pasteboard of the computer (i.e. when you copy some text) and pastes the resulting string to RelayKeys
i.e.
relaykeys-cli.exe paste
Types the string following the :. Note you will need to escape spaces etc
relaykeys-cli.exe type:Hello\ World
You can send special characters, ones that are usually shifted, by sending the key and the shift modifier (see keyevent below). But for the type and paste commands we have some other characters that are hardcoded and it will do the conversion on the fly.
So for example, to send the @ symbol:
relaykeys-cli.exe type:@
All codes which are converted can be seen below. NB: \t = Tab \r\n are line breaks~
Sends the KEY and any modifier, For example:
relaykeys-cli.exe keypress:A
Will emulate pressing and releasing the letter A. What about a shift?
relaykeys-cli.exe keypress:A,LSHIFT
Will emulate pressing the A with Left Shift. i.e. Upper casing the A.
relaykeys-cliexe keypress:RIGHTARROW,LSHIFT,LCTRL
Will press the right arrow, left shit and left control (would select the next word in programs like word)
Left Control/CTRL: LCTRL
Left Shift : LSHIFT
Left Alt/Alt: LALT
If you are wanting to send two keys with a modifier - send the key - then modifier. E.g. keypress:C,LCTRL - not the other way round!
If you are sending to iOS or a Mac - remember that they use the Command (LMETA) key - often where windows uses the CTRL key read for more examples
We also have a limited number of consumer keys - namely volume related (if you need others do )
Volume Up: VOLUP
Volume Down: VOLDOWN
Mute: MUTE
So all the other keys are defined below. We will try and explain what these are when its ambiguous
Emulates holding or releasing one key with a modifer. For example:
relaykeys-cli.exe keyevent:A,LSHIFT,1
Emulates pressing a A with Shift Down. To release:
relaykeys-cli.exe keyevent:A,LSHIFT,0
So a classic example is to emulate pressing the Alt key and Tab key. Commonly used to switch applications. To do this you would need to send two commands.
Releases any keys that may have been held down, e.g. a modifier Particularly useful if you need to type on one the receiving device with a different keyboard.
Sends the command to move the mouse x Pixels Right and x Pixels Down. To go in the other direction send negative numbers. Eg. To go Right by 10 and Down by 10
relaykeys-cli.exe mousemove:10,10
and Left by 10, Up by 10:
relaykeys-cli.exe mousemove:-10,-10
Straight up:
relaykeys-cli.exe mousemove:0,-10
Straight down:
relaykeys-cli.exe mousemove:0,10
Straight right:
relaykeys-cli.exe mousemove:10,0
Straight left:
relaykeys-cli.exe mousemove:-10,0
Want a way of repeating a mousemove for a while?
Run the application called mouserepeat.exe which uou will find in the RelayKeys install folder. Run it with mouserepeat.exe -x 10 -y 10 - where that is your mouse direction to move it in. It will then repeat that until you quit the application. To do this run a powershell script:
Stop-Process -Name "mouserepeat"
Sends the Mouse button press. Mouse buttons available:
L: Left
R: Right
M: Middle
Behaviours:
click
doubleclick
Note: If you don't provide a behaviour it will hold and release the button for 0 Seconds.
Send a doubleclick:
relaykeys-cli.exe mousebutton:L,doubleclick
Send a right click:
relaykeys-cli.exe mousebutton:R,click
What about dragging?
Activate Drag Start button
relaykeys-cli mousebutton:L,press
User moves mouse
relaykeys-cli mousemove:x,y
User moves mouse some more
relaykeys-cli mousemove:x,y
user activates Drag Stop button
relaykeys-cli mousebutton:0
Adds a delay. Particularly useful when writing a macro and you need to wait for something to happen on the client operating system.
relaykeys-cli delay:1000
Puts in a a delay of 1 second.
On the following commands you can provide a --notify flag. If so your Operating System will return a system notification. Useful if you dont have access to view the command line. Or if you wish provide a --copy flag. This will return the results to your pasteboard for you to paste the data back. Be careful with this. It will overwrite any copy/paste functions you may already have.
relaykeys-cli.exe ble_cmd:devname
Returns the currently connected device
relaykeys-cli.exe ble_cmd:devlist
Gets a list of devices that the device has in memory
relaykeys-cli.exe ble_cmd:devadd
Put the device into a pairing state
relaykeys-cli.exe ble_cmd:devreset
Reset the entire stored devices (its like wiping the volatile memory)
relaykeys-cli.exe ble_cmd:switch
Switch the current connected device to the next one in RelayKeys memory
relaykeys-cli.exe ble_cmd:switch:"Name" --notify
Switches BLE device by the name of a device.
relaykeys-cli.exe ble_cmd:devremove=DEVNAME
Remove just one named device from the memory.
relaykeys-cli.exe ble_cmd:reconnect
Tells the daemon/server to try and reconnect to the serial port.
relaykeys-cli.exe daemon:switch_mode
Tells the daemon/server to try and switch between wired
relaykeys-cli.exe daemon:get_mode
Returns current mode
relaykeys-cli.exe daemon:dongle_status
Returns whether it is connected or not
relaykeys-cli.exe ble_cmd:get_mode
Gets the current mode - wired or wireless
relaykeys-cli.exe ble_cmd:switch_mode
Switches mode from Wired -> Wireless and Wireless-> Wired.
Provide a macro file - where each line in a text file is a cli command. For example ios_open_notes.txt found in the macros directory of the installation folder (i.e at C:\Program Files (x86)\Ace Centre\RelayKeys\maccros)
relaykeys-cli.exe -f ios_open_notes.txt
or like this
relaykeys-cli.exe -f Documents/open_ios_notes.txt
where it reads the file from a file path.. or..
relaykeys-cli.exe -f ./open_ios_notes.txt
where it reads the file in folder where current exe is run from\
where ios_open_notes.txt is:
Warning: There is no syntax checking of this document.
Want to send a long string of mouse commands and want to record your movements for a script? Use the RelayKeys-QT app and use the record macro function!
(Left) Meta/Windows Key/Mac Key/Command Key: LMETA Note: On Windows there is generally only one Windows key. So use LMETA to emulate pressing the Windows key
Right Control/CTRL:: LCTRL
Right Shift : RSHIFT
(Right) Meta/Windows Key/Mac Key/Command Key: RMETA
2
3
4
5
6
7
8
9
A
B
C
D
E
F
G
H
I
J
K
L
M
N
O
P
Q
R
S
T
U
V
W
X
Y
Z
BACKSPACE - Back Delete key
ENTER - Return
DELETE - Forward delete key
TAB
PAUSE
ESCAPE
SPACE
QUOTE
COMMA
MINUS
PERIOD
SLASH
SEMICOLON
EQUALS
LEFTBRACKET
BACKSLASH
RIGHTBRACKET
BACKQUOTE
KP0
KP1
KP2
KP3
KP4
KP5
KP6
KP7
KP8
KP9
KP_PERIOD
KP_DIVIDE
KP_MULTIPLY
KP_MINUS
KP_PLUS
KP_ENTER
KP_EQUAL - Keypad =
KP_COMMA
KP_EQSIGN
UP
DOWN
RIGHT
LEFT
INSERT
HOME
END
PAGEUP
PAGEDOWN
F1
F2
F3
F4
F5
F6
F7
F8
F9
F10
F11
F12
NUMLOCK
CAPSLOCK
SCROLLOCK
RIGHTARROW
LEFTARROW
DOWNARROW
UPARROW
APP
LGUI - Keyboard Left GUI
RGUI - Keyboard Right GUI
CUSTOM~ - Keyboard Non-US # and ~
PRINTSCREEN
POWER
EXECUTE
HELP
MENU
SELECT
STOP
AGAIN
UNDO
CUT
COPY
PASTE
FIND
MUTE
VOLUP
VOLDOWN
LOCKING_CAPSLOCK
LOCKING_NUMLOCK
LOCKING_SCROLLOCK
ALTERASE
ATTENTION
CANCEL
CLEAR
PRIOR
RETURN
SEPARATOR
OUT 0xA0
OPER 0xA1
B: Scroll Backward
    relaykeys-cli-win.exe" keyevent:TAB,LALT,1
relaykeys-cli-win.exe" keyevent:TAB,LALT,0keypress:H,LMETA
keypress:SPACE,LMETA
type:notes
delay:500
keypress:ENTER